1. Find out the network cards connected to the system:
Run command:
ls /sys/class/net

We can see that we have 3 NICs connected. If you are working with virtualized system and you have multiple NICs you can verify that you have the correct one using MAC address, it should be shown in your VM host software. And on the system you can verify it by using for example command:
ip a
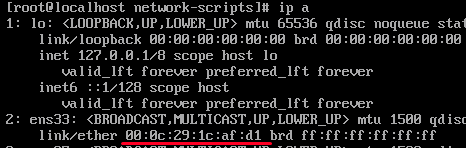
Note: I am using `ls /sys/class/net` because it should be reliable source to really know about all NICs. If you would use for example old command `ifconfig` instead of ip a, unconfigured interfaces might not be shown.
2. The network configuration scripts are located under `/etc/sysconfig/network-scripts`

Each interface has its own config file. You can use editors such as nano or vi. In clean CentOS 7 the vi is only available editor. If you don’t know how to use vi check this tutorial.
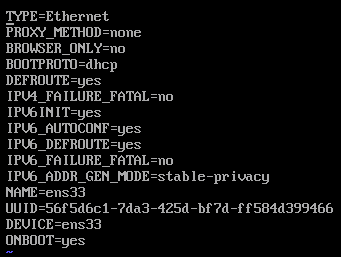
Let’s open (create in case it’s not there) the ifcfg-ens33:
sudo vi ifcfg-ens33
Note: You need root rights for editing the file. Execute with sudo or log into root sudo su
3. Changing the config:
BOOTPROTO=static
With this we define that we have static IP.
DEFROUTE=yes / no
This is important config if you have multi interface set-up. This defines if default route should be reconfigured to this interface. So set yes / no based on this. (yes if you have 1 interface system)
IPV6INIT=no
We don’t need ip v6 in our internal network so we won’t set this up. So delete any other lines with IPV6.
ONBOOT=yes
Specify if this interface should be bring up on system boot. Most likely yes.
Now let’s add new lines:
IPADDR=10.0.11.5
The new static IP of the machine
NETMASK=255.255.255.0
You can use this cheat-sheet to help determine your netmask. If you don’t know what to enter, just put the same as provided. It’s the subnet mask for “classic” subnet /24.
GATEWAY=10.0.11.1
Gateways are almost always on the first ip from your subnet.
USERCTL=no
In case you don’t want non-root users to control this device, set to no.
Setting up the DNS:
There are 2 ways how to do it.
1#
Set config:
PEERDNS=no
This config blocks DHCP server from modifying the .conf file. We are not using it, so it’s not necessary to set it. But it’s important to know in case you find it in the config.
Than add static DNS to /etc/resolv.conf
nameserver 8.8.8.8
nameserver 1.1.1.1
2#
Specify it directly in the ifcfg-ens33 config file:
...
ONBOOT=yes
DNS1=8.8.8.8
DNS2=1.1.1.1
No need to specify it in the /etc/resolv.conf anymore.
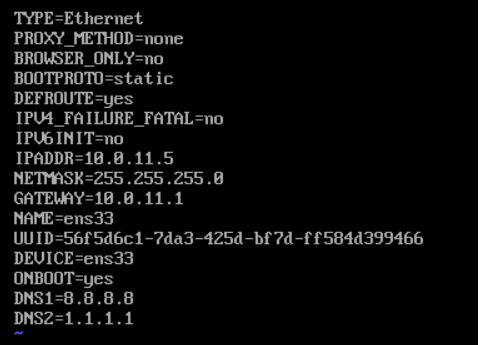
Your config file should look like this now:
4. Bring up the interface
sudo ifdown ens33
sudo ifup ens33
Verify that the interface is correctly set-up using command ip a

5. Tips for debugging
In case the network doesn’t work. Here are few useful tips which helped me realize where are the problems:
ping <gateway ip> ( ping your gateway, to see if you can get there)
ping -I <YourInterfaceIP> <yourDestination> (this forces the ping to use specific interface in case you have more than one)
ip route show (show the internal routing table – check the )
traceroute 8.8.8.8 (show the route, aka where the packet hops, might not be installed by default)
tcpdump -i <interface> (tcp dump, aka dump everything what is happening on that interafce – useful when you have multi interface setup, might not be installed by default)
